h ام ناصر

h ام ناصر @h_am_nasr

عضوة مميزة

تريكو البيبي بالباترون

الكروشيه والتريكو


Haiku
by Kristi Porter


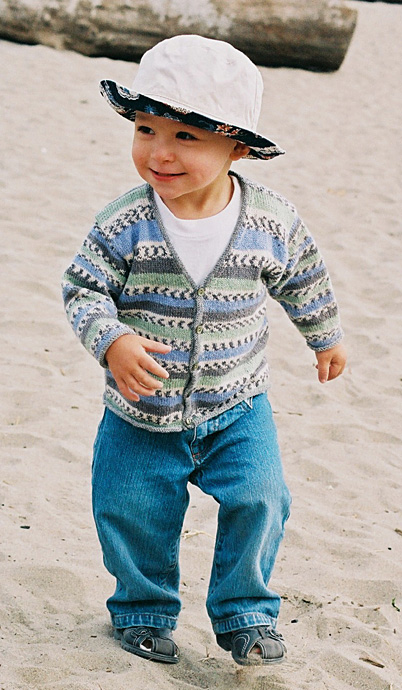
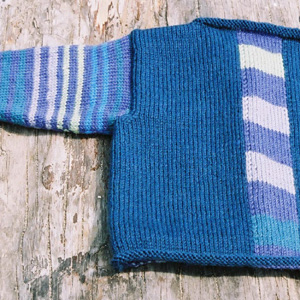
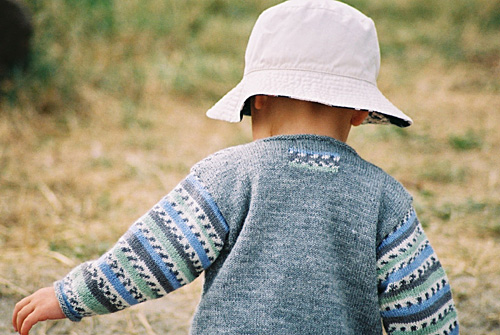
A boxy, cropped cardigan for little girls and boys. Haiku is an easy project for novice knitters.

It is worked side to side, mainly in garter stitch, and requires very little finishing work.

The pattern is called Haiku because my initial inspiration came from an adult sweater with a poetic name that was knit side to side. Haiku, however, is smaller, simpler, and stripped-down.

Further, the first time I wrote down the idea for the pattern, it looked like this:
co 11", k 3.5", co 2", k5",
bo 6", k 1", co 6", k 15", bo 6", k 1", co 6",
k 5", bo 2", k 3.5", co all.

model: Ella Bleicher photo: Kristi Porter

SIZES
Directions are given for size 1-2 .
The sizing should fit average children of these ages, however the pattern is easily altered to accomodate longer arms or torsos. Just measure a favorite sweater and insert your own measurements.

MATERIALS
Haiku is designed to work with any yarn and the appropriate needles. A chunkier yarn will give you a quick knit and a bulkier sweater; a finer gauge yarn will yield a more elegant sweater. The model is knit with worsted weight 100% cotton yarn.
For the smaller size, you will need approximately 400 yds of worsted weight yarn.
For the larger size, you will need approximately 550 yds of worsted weight yarn.
Read the following section on gauge carefully.

GAUGE
Simply knit a swatch in garter st to obtain your gauge and copy it into the spaces provided within the pattern. Then, do the math to obtain the appropriate number of sts for your size and gauge. Write these numbers into the "sts" spaces provided.

GAUGE = _____ sts per inch.

STITCHES USED
Garter Stitch: Knit all rows
Box Stitch: Rows 1 and 4: * k2, p2*, Rows 2 and 3: *p2, k2*

DIRECTIONS
RIGHT FRONT
Cast on gauge_____ x 9 (12) =_____ sts.
Knit in garter st for 3 (3.5) inches.
Cast on an additional gauge_____x 1.5 (2) = _____ sts at neck edge.
Work in box st for 2 inches.
Switch back to garter st for 2 (3) inches.

RIGHT ARMHOLE
BO gauge_____ x 4.5 (6) =_____ sts, beg at neck edge.
Work in garter st for 1 inch.
Cast on gauge_____ x 4.5 (6) = _____ sts.

BACK
K in garter st for 2 (3) inches.
Work in box st for 2 inches.
Bind off gauge_____ x 1 sts at neck edge.
K in garter st for 4 (5) inches.
Cast on gauge_____ x 1 sts at neck edge.
Work in box st for 2 inches.
Switch back to garter st for 2 (3) inches.

LEFT ARMHOLE
BO gauge_____ x 4.5 (6) =_____ sts, beg at neck edge.
Work in garter st for 1 inch.
CO gauge_____ x 4.5 (6) = _____ sts.

LEFT FRONT
Knit 2 inches in garter st.
Knit 2 inches in box st.
BO gauge _____ x 1.5 (2) = _____ sts at neck edge.
Knit in garter st for 2.5 (3) inches.

Beg 2 sts from neck edge, work 4 or 5 buttonholes evenly spaced along row. For each buttonhole, BO 2 sts; on next row, CO 2 sts above the bound-off sts.

Continue knitting until piece measures 3 (3.5) inches from last dec.

BO all sts.

SLEEVES
CO gauge_____ x 6.5 (8) = _____ sts.

Work in garter st, except for 10 sts at center of sleeve which are worked in box st.


Continue to work sleeve in this manner, inc 1 st at beg and end of row every 6th row until you have gauge_____ x 10 (13) _______sts.
Continue until sleeve measures 7 (10) inches.
BO all sts.

FINISHING
Sew shoulder seams together. Sew sleeve seam together. Sew sleeves to body with seam at bottom of armhole. Sew on buttons opposite buttonholes.


تـــــابع
7
1K

يلزم عليك تسجيل الدخول أولًا لكتابة تعليق.

تسجيل دخول

h ام ناصر
h ام ناصر
or


Anouk is a pinafore that will grow with a baby. At first it is a dress and will gradually become a tunic. The side bands can always be lengthened when the baby's chest size is larger, so it could be worn over a shirt later.

Anouk breaks away from all of the pink dresses your friend probably got when her baby was born, but is still feminine with red poppies growing out of the green grass.

Knit the flowers in intarsia if you're up to it , or use duplicate stitch if you prefer.

model: Anouk Fromentière photo: Kate Gilbert


SIZE
3 months

FINISHED MEASUREMENTS
To fit chest: 16 inches
Length: 13.25 inches


MATERIALS

Cascade Yarns Pima Tencel ;
MC: 1273 (Orange); 2 skeins
CC1: 4084 (Green); 1 skein
CC2: 2493 (Purple); 1 skein
CC3: 7478 (Red); 1 skein

1 set US #6/4mm single point needles
1 US #6/4mm circular needle
1 US #7/4.5mm or US #8/5mm needle
3 1/2 inch buttons
Yarn needle


GAUGE
18 sts/26.5 rows = 4" in stockinette stitch


DIRECTIONS
Front and Back Skirt
With CC1 and straight needles, CO 69 sts.
Rows 1-5: *K1, p1* repeat until 1 st remains, k last st.
Row 6: k1, p1, k1, p until 3 sts remain on left needle, k1, p1, k1.
Row 7 (dec row): k1, p1, k1, p1, k1, ssk, k until 7 sts remain on left needle, k2tog, k1, p1, k1, p1, k1. (67 sts).
Row 8: k1, p1, k1, p until 3 sts remain on left needle, k1, p1, k1.
Row 9: k1, p1, k1, p1, k until 4 sts remain on left needle, p1, k1, p1, k1.

Repeat rows 8 and 9 until work measures 6.75 inches from beg, ending with RS facing. At the same time, change to MC on row 15 and work dec rows as follows:
3 months: Work decs (as in row 7) in rows 11, 17, 23, 29, 35, 41. (55 sts).
6 months: Work decs (as in row 7) in rows 13, 19, 25, 33, 41, 49. (57 sts).
12 months: Work decs (as in row 7) in rows 13, 19, 25, 33, 41, 49. (61 sts).
18 months: Work decs (as in row 7) in rows 13, 21, 29, 37, 45, 53, 61, 69. (61 sts).

Front and Back Bodice
3 months:
Next row: Work 4 sts in seed st, k1, (ssk, k2) 5 times, ssk, k1, k2tog, (k2, k2tog) 5 times, k1, work 4 sts in seed st. (43 sts)
Work dec row EOR 4 times. (35 sts)
Cont even in patt as established until work measures 11.5 inches from beg, ending with RS facing.

6 months:
Next row: Work 4 sts in seed st, k1, (ssk, k2) 6 times, k1, k2tog, (k2, k2tog) 5 times, k1, work 4 sts in seed st. (45 sts)
Work dec row EOR 5 times. (35 sts)
Cont even in patt as established until work measures 13.25 inches from beg, ending with RS facing.

12 months:
Next row: Work 4 sts in seed st, (k2, ssk) 6 times, k3, (k2tog, k2) 6 times, k1, work 4 sts in seed st. (49 sts)
Work dec row EOR 5 times. (39 sts)
Cont even in patt as established until work measures 15 inches from beg, ending with RS facing.

18 months:
Next row: Work 4 sts in seed st, (k2, ssk) 6 times, k3, (k2tog, k2) 6 times, k1, work 4 sts in seed st. (49 sts)
Work dec row EOR 5 times. (39 sts)
Cont even in patt as established until work measures 17.5 inches from beg, ending with RS facing.

Neck Shaping
Work 13 sts in patt, place these sts on a holder, BO 9, work to end in patt. Turn and work 1 row even.
BO 3 sts at beg of next row. Work 1 row even. BO 2 sts at beg of next row. Work 1 row even. BO 2 sts at beg of next row. Work 1 row even. BO 1 st at beg of next row. Work 1 row even.
Rejoin yarn and rep neck shaping for other side, reversing shaping.
Left Front Shoulder (all sizes)
Next row (RS): K until 4 sts remain on left needle, work 4 sts in seed st.
Next row: Work 4 sts in seed st, p to neck.
Next row: K until 4 sts remain on left needle, work 4 sts in seed st.
Next row: Work 4 sts in seed st, p to neck.
Place all sts on holder.

Right Front Shoulder (all sizes)
Next row (RS): Work 4 sts in seed st, yo, k2tog.
Next row: Work entire row in seed st
BO in patt.

Left Back Shoulder (all sizes)
Next row (RS): Work 4 sts in seed st, k rem sts.
Next row: Work entire row in seed st
BO in patt.

Right Back Shoulder (all sizes)
Next row (RS): Work 4 sts in seed st, k rem sts.
Next row: P until 4 sts remain on left needle, work 4 sts in seed st.
Next row: Work 4 sts in seed st, k rem sts.
Next row: P until 4 sts remain on left needle, work 4 sts in seed st.
Place all sts on holder.


Pockets
Note: If you find knitting intarsia too difficult, knit the pocket all in CC2 and then add the flower using duplicate st.
Knit 1 pocket according to chart.
Knit flower on second pocket as mirror image of first.
Leave a long tail to sew on the pocket.

Side tabs
You can choose tabs with one or two buttonholes.
Make 2.

Side tabs with one buttonhole
With CC2, CO 5 sts.
Work even in seed st until tab measures 2 inches from beg.
Next row: K1, p1, yo, p2tog, k1
Work 4 rows even in patt.
BO in patt.

Side tabs with two buttonholes (To adjust for quickly growing tummies):
With CC2, CO 5 sts.
Work even in seed st until tab measures 2 inches from beg.
Next row: K1, p1, yo, p2tog, k1
Work 4 rows even in patt.
Next row: K1, p1, yo, p2tog, k1
Work 4 rows even in patt.
BO in patt.


FINISHING
With RSs facing each other, bind the shoulders off together using a 3 needle BO and largest straight needles.

Collar
With MC and circular needle, beg at back left shoulder, pick up 67 sts evenly around neck edge. Do not join.
Work 4 rows even in seed stitch. Make sure you don't knit the buttonhole closed!
BO in patt.


With CC2, sew on pockets. Place them 2 or 3 sts in from the seed st edge, with the bottom touching but not covering the green. Make a duplicate st using the tail of the CC1 so the stem will connect to the "grass".
With CC2, sew on side tabs. For all sizes, sew one tab on back on each side at top of skirt. On larger sizes, sew a second tab 2.5 inches higher.

Sew buttons on front seed stitch edges.
Sew button on left back shoulder.
h ام ناصر
h ام ناصر
This super easy garment is made in one piece, starting at one sleeve cuff and working your way over. The only finishing required is sewing the underarm seams.

Materials: 8 ounces of knitting worsted weight yarn

1 pair knitting needles size 10 Gauge 15 sts + 4 inches


Sizes are for 2 (4, 6)

Starting at sleeve edge, cast on 32 (36, 38) sts. Work in garter st (knit every row) for 6 ½ ,( 7, 7 ½ ) inches. At the beginning of the next 2 rows cast on 25 (29, 33) sts., work in garter st for 8 (10, 10) more rows. Next row, knit 5, purl 20 (24, 28) knit 32 (36, 38), purl 20 (24, 28) knit 5. Next row, knit all across row. Repeat the last 2 rows, twice more. Now, knit every row for 6 rows. Next row (divide for neck opening), knit 39 sts (45,50), join new ball of yarn, bind off next 4 sts, work rem 39 (45, 50). Working both sides at once, each on a separate ball of yarn, keeping 5 sts at bottom edges in garter st, center sts in stockinette st (k 1 row, p 1 row), and neck edges in garter st, work for 4 ¾ (5 ¾, 6 ¾) inches MORE, ending on a wrong side row. Next row, knit all sts to neck opening, cast on 4 sts, join as one piece again and continue knitting on other side. Work 6 rows garter st. then 6 rows keeping Garter st at ends and yoke 32 (36, 38)sts , and center sts in st st. Continue in this manner working to correspond to other side, BINDING off 25 (29, 33) sts instead of casting on. 32 (36, 38 sts). Work garter st for 6 ½, (7, 7 ½) Bind off.


Finishing: Sew both underarm seams

Do not block


MATCHING HAT: Cast on 64 (72, 72) Garter st for 1 ½ (2, 2) inches. Work ST ST , until 5 ½ (6, 6) inches from beg. End on a purl row. Dec as follows:


1st (dec. row): *Knit 6, k tog , repeat from * across row.

2nd Purl

3rd (dec row): *Knit 5, k 2 tog, repeat from * across row.

4th Purl

5th (dec row): *Knit 4, k 2 tog, repeat from * across row.

6th Purl , do not bind off, cut yarn, leaving a long end for sewing. Thread a yarn needle with yarn, pull this yarn through rem sts on knitting needle, draw up tightly, anchor end of hat, then using same yarn, sew back seam to finish hat.


Top corkscrews: Make 3. Cast on 20 sts. Knit, inc every st. (40 sts), bind off.

Attach to top of hat.
h ام ناصر
h ام ناصر
Check out this fun cardi for the active child on your gift list. With its Fair Isle-like front and sleeves it's great for spring or fall. The small sizes showcase self-patterning yarn to great effect. And even though the sweaters are knit with fingering weight yarn, the tiny sizes knit up quick.

The back of this sweater is knit in a co-ordinating solid color, but you can throw in a little surprise designer detail if you like. I've provided instructions for a small rectangle inserted below the neckline, or a long stripe of pattern up the solid color back. Choose one, or personalize even more by designing your own variation.

The model shown is a size 1-2 years and although it was knit using DGB Confetti, you can knit it with any of the other self-patterning sock yarns around. So far, I've used a number of the other yarns including Fortissima Mexiko, Regia, Lang Jawoll Jacquard and Opal. They all look great.

Choose a coordinating solid color in the same gauge for all the edgings and the sweater back.

To match the striping on the cardigan fronts and sleeves, when joining MC start at the beginning of a solid color in the patterning sequence. Use the same solid color to start both fronts. Do the same for the sleeves, although you may begin with a different solid color. This will create some wastage but you will have plenty of yarn to complete your sweater.

Another trick to help match the striping on the cardigan fronts is to start one front with a knit row and the other front with a purl row. This makes the two fronts mirror images of one another.

In order to maintain the color patterning, when the ball runs out, be sure to join self-patterning yarn in the same solid-colored section of the pattern sequence.

model: Devan Yeoh photo: Nigel Pottle


SIZE
0-6 mo

FINISHED MEASUREMENTS
Chest: 20.5 inches
Length: 10 inches
When measuring the length from an edge with a rolled hem, allow a 0.5 inch at the cast-on edge to roll out to the RS. Do not unroll the edge completely before measuring.


MATERIALS

DGB Confetti ;
color: 24001; 2 skeins
DGB Confetti ;
color: silver (9026); 1 skeins

1 set 2.5 mm straight needles
1 set 3 mm straight needles
4 stitch holders
4 stitch markers
4 buttons


GAUGE
30 sts/42 rows = 4" in stockinette stitch


STITCH PATTERNS
LM1 -- left-slanting make one increase - with the left-hand needle, pick up the strand between the last st worked and the st on your left-hand needle from the front to the back, work into the back of the st to make an increase

RM1 - right-slanting make one increase - with the left-hand needle, pick up the strand between the last st worked and the st on your left-hand needle from back to front, work into the front of the st to make an increase

SM - slip marker
Left Front
With smaller needles and CC, CO 39 sts. Beg with a K row, work even in st st for 6 rows.
Change to MC and work 2 more rows.
Change to larger needles and work even in st st until piece measures 5.5 inches from beg, ending with RS facing.

Shape armhole and neck
BO 3 sts at beg of next row, knit to last 4 sts, K2tog, K2.
Dec 1 st (use SSK on RS and SSP on WS) at armhole edge (right-hand edge of garment) of next 3 rows and, at the same time, at neck edge dec 1 st (use K2tog) EOR row 8 times; then every 4th row 6 times. (18 sts).
Work even in st st until armhole measures 4.5 inches, ending with RS facing.
Place shoulder sts on a holder.
Break yarn, leaving a tail 14 inches long.

Right Front
With smaller needles and CC, CO 39 sts. Beg with a P row, work even in st st for 6 rows.
Change to MC and work 2 more rows.
Change to larger needles and work even in st st until piece measures 5.5 inches from beg, ending with WS facing.

Shape armhole and neck
BO 3 sts at beg of next row.
Dec 1 st (use K2tog on WS and P2tog on WS) at armhole edge (left-hand edge of garment) of next 3 rows and,at the same time, at neck edge dec 1 st (use SSK) on next and then EOR 8 times; then every 4th row 6 times. (18 sts).
Work even in st st until armhole measures 4.5 inches, ending with WS facing.
Place shoulder sts on a holder.
Break yarn, leaving a tail 14 inches long.

Sleeves (make 2)
With smaller needles and CC, CO 42 sts. Beg with a K row, work even in st st for 6 rows.
Change to MC and work 2 more rows.
Change to larger needles and inc 1 st at each edge of next and then every foll 4th row 7(7, 14, 4) times, (58(64, 78, 64) sts), then every foll 6th row 4 (6, 3, 13) times. (66 sts).
Work even in st st until sleeve measures 6.5 inches from beg, ending with RS facing.

Sleeve cap
BO 3 sts at beg of next 2 row
Dec 1 st at each edge of next 3 rows. (54 sts).
BO.


Back -- stripe version

With smaller needles and CC, CO 78 sts.
Beg with a K row, work even in st st for 6 rows.
Next row: K33 sts, join a ball of MC and K 12 sts, join a second ball of CC and K rem 33 sts. Be sure to twist yarns MC and CC on WS when changing colors to avoid forming holes.
P next row in color patt as established.
Change to larger needles and work even as established until piece measures 5.5 inches from beg, ending with RS facing.

Shape armholes
BO 3 sts at beg of next 2 rows. Dec 1 st at each edge of next 3 rows. (66 sts).
Work even in st st until armhole measures 4.5 inches, ending with RS facing.

Shape neck and shoulders
K18 sts and place these shoulder sts on a holder, BO 30 sts, K to end and place these 18 sts on a holder.
h ام ناصر
h ام ناصر
Back -- patch version
This detail works best with a jacquard self-striping yarn.
With smaller needles and CC, CO 78 sts. Beg with a K row, work even in st st for 8 rows.
Change to larger needles and work even in st st until piece measures 5.5 inches from beg, ending with RS facing.

Shape armholes
BO 3 sts at beg of next 2 rows. Dec 1 st at each end of next 3 rows. (66 sts).
Work even in st st until armhole measures 2.75 inches, ending with a RS facing.

Patch detail
K25 sts, join a solid color from a ball of MC and K16 sts, join a second ball of CC and K rem 25 sts. Be sure to twist yarns MC and CC on WS when changing colors to avoid forming holes.
Next row: P in color patt as established.
Next 8 rows: Work as established, but use jacquard section of MC for next 2 rows of rectangle (see photo), then 2 rows of a different solid from MC, 2 rows jacquard and a final 2 rows of a third solid color from MC. This completes the rectangle.
Work even in st st with CC only until armhole measures 4.5 inches, ending with RS facing.

Shape neck and shoulders
K18 sts and place these shoulder sts on a holder, BO 30 sts, K to end and place these 18 sts on a holder.


FINISHING
Block all pieces allowing 0.5 inch at CO edges to roll up to RS. Holding RSs tog, join both shoulder seams using three-needle bind-off, working from shoulder edge towards neck edge.

Front band

With RS facing, smaller needles and CC, beginning and ending 4 rows up from lower CO edge, pick up 41 sts up right front opening to start of V-neck shaping, PM, pick up 1 st, PM, pick up 32 sts to right shoulder seam, pick up 2 sts down back of right shoulder, K30 sts from back neck holder, pick up 2 sts up back shoulder to left shoulder seam, pick up 32 sts to left V-neck shaping, PM, pick up 1 st, PM, pick up 41 sts down left front opening edge. (182 sts).

1st row: (WS) K all sts, slipping markers as you go.
2nd row:
For girl's sweater: K1, P2, *YO, P2tog, P10; rep from * to last 2 sts before first marker, YO, P2tog, SM, RM1, P1, LM1, SM, P to next marker, SM, RM1, P1, LM1, SM, P to last st, K1.
For boy's sweater: K1, *purl to first marker, SM, RM1, P1, LM1, SM; rep from * once, **YO, P2tog, P10; rep from ** to last 5 sts, YO, P2tog, P2, K1. (4 buttonholes).
3rd row: K all sts, slipping markers.
4th row: K1, *P to first marker, RM1, P3, LM1 (removing markers as you go); rep from *, P to last st, K1. (190 sts).
BO knitwise (WS).

Use mattress st to sew sleeves onto body, then sew side and sleeve seams allowing 0.5 inch at cast-on edges of body and sleeves to roll up to RS. Use an edge-to-edge seam on the roll so the seam lies flat. Sew on buttons to correspond with buttonholes.


A
10.25 inches
E
5.5 inches

B
10 inches
F
6.5 inches

C
5.5 inches
G
8.75 inches

D
4.5 inches
h ام ناصر
h ام ناصر
Halweh is the Arabic word for “sweet” and there is no doubt that your little girl will look incredibly sweet in this frilly top. Knit from the top down, this pattern offers you two options for both the collar (plain or ribbon) and the color scheme (monotone or with contrast collar and trimmings). The frilling edging is from Nicky Epstein’s Knitting on the Edge. The sizes range from newborn to four years. How sweet!

Difficulty level
Intermediate

Size
Newborn (6 months, 12-18 months, 2 years, 4 years)
Finished chest: 17 (19, 21, 23, 25)" (43 cm)

Materials
Single color top: 2 (3, 4, 5, 6) balls Debbie Bliss Baby Cashmerino (55% wool, 33% microfiber, 12% cashmere; 137 yards per 50g), color #608 lilac

Contrast collar top: 2 (2, 3, 3, 4) balls Debbie Bliss Baby Cashmerino, color #003 mint
1 (1, 2, 2, 3) balls color #101 off white

16" or 20" (40 or 50cm) circular needle, size US 4 (3.5mm)
24" or 29" (60 or 80cm) circular needle, size US 4 (3.5mm)

5 stitch markers
Waste yarn
Tapestry needle
Size US D (3mm) crochet hook
1/2" (13mm) button
Ribbon (optional)

Gauge
24 sts and 32 rows = 4" (10cm) in stockinette

Abbreviations
k2tog: knit two together
kfb: (knit front and back) knit the stitch, leaving it on the left needle, then knit it again through the back loop
m1: make 1 stitch: Insert left needle, from front to back, under strand of yarn which runs between last stitch on left needle and first stitch on right needle; knit this stitch through back loop – one stitch increased.
pm: place marker
sl: slip
sm: slip marker
ssk: slip 2 stitches as if to knit, then knit those 2 stitches together
yo: yarn over
ch: chain
sc: single crochet


Collar
Using long tail method, cast on 159 (171, 195, 213, 231) sts (using CC if desired).
Row 1, 2: Sl 1, k across.
Row 3, 5, 7: Sl 1, p across.
Row 4: Sl 1, k 3 (5, 3, 3, 3), * yo, k2, ssk, k2tog, k2, yo, k1; repeat from * to last 2 (3, 2, 2, 2) sts, k 2 (3, 2, 2, 2).
Row 6: Sl 1, k 2 (4, 2, 2, 2)., * yo, k2, ssk, k2tog, k2, yo, k1; repeat from * to last 3 (4, 3, 3, 3) sts, k 3 (4, 3, 3, 3).
Repeat Rows 4-7 1 (1, 2, 2, 3) more times.
Repeat Rows 4-5 0 (1, 0, 1, 0) more times.
Next row: Size 6 mos. only: Sl 1, k3tog across to last 2 sts, k2. All other sizes: Sl 1, k3tog across to last 2, k2tog.
You will now have 54 (60, 66, 72, 78) stitches.

Collar band
Option 1: Ribbon band
Please use caution when deciding whether or not to include a ribbon band as for certain ages it could pose a choking hazard.
Rows 1, 3, 7, 9: Purl.
Rows 2, 8: K2 (3, 2, 3, 2)* yo, k2tog, k2; repeat from * across, end k0 (1, 0, 1, 0).
Rows 4-6: Knit.
Row 10: *Pick up corresponding purl bump from the k3tog row with the right needle, place this stitch on the left needle, k2tog; repeat from * across.

Option 2: Plain collar band
Row 1: Purl. Rows 2-4: Knit. Row 5: Purl. Row 6: *Pick up corresponding purl bump from the k3tog row with the right needle, place this stitch on the left needle, k2tog; repeat from * across.

Yoke above neck slit
If you used CC for collar, change to MC at the beginning of row 1.
Row 1: Sl 1, k 9 (10, 11, 12, 13), kfb, pm, kfb, k 3 (4, 5, 6, 7), kfb, pm, kfb, k 20 (22, 24, 26, 28), kfb, pm, kfb, k 3 (4, 5, 6, 7), kfb, pm, kfb, k 10 (11, 12, 13, 14).
Row 2: Sl 1, purl across, slipping all markers.
Row 3: Sl 1, *knit to 1 st before marker, kfb, sm, kfb; repeat from * across.
Repeat Rows 2-3 7 (8, 9, 10, 11) more times.
Repeat Row 2 one more time.
126 (140, 154, 168, 182) sts.

Yoke below neck slit
Round 1: Pm (this marker marks the beginning of the round at the center back), s l 1, *knit to 1 st before marker, kfb, sm, kfb; repeat from * across. Join. You will now be knitting in the round.
Round 2: Knit around, slipping all markers.
Round 3: Sm, * knit to 1 st before marker, kfb, sm, kfb; repeat from * across.
Repeat Rounds 2-3 3 (4, 4, 5, 6) more times.
166 (188, 202, 224, 246) sts.


Body
You will now be placing the sleeves onto waste yarn, to be picked up again later.
Round 1: Sm, *knit to next marker, remove marker, sl all stitches between here and next marker onto waste yarn, cast on 2 (2, 3, 3, 3) sts, pm, cast on 2 (2, 3, 3, 3) sts, remove marker; repeat from * one time, knit to end of round. 104 (116, 126, 138, 150) sts.

Knit even for 3.25 (3.5, 3.75, 4, 4.25)” / 8.3 (8.9, 9.5, 10.1, 10.7)cm, slipping all markers.
Increase Round: *Knit to 9 (10, 11, 12, 13) sts before marker, m1, knit to marker, sm, k 9 (10, 11, 12, 13), m1; repeat from * once more, knit to end of round.
Repeat Increase Round on every following 7th (8th, 6th, 6th, 6th) round 3 (3, 4, 4, 5) times. 120 (132, 146, 158, 174) sts.
As you knit the next round, remove the two markers under the sleeves, leaving only the beginning-of-round marker. Knit 8 (7, 5, 7, 4) rounds even.

Body trim
If working contrast collar top, change to CC at the beginning of round 1.
Rounds 1, 3: Knit around to 1 st before marker, p1.
Rounds 2, 4: Purl.
Cast off all sts loosely.

Right sleeve
With RS facing, starting at the front base of the sleeve, replace half of the 33 (38, 41, 46, 51) held sts onto first circular needle, and the second half of the held sts onto the second circular needle. Pick up and knit 4 (4, 6, 6, 6) sts at underarm with needle 2, pm.
Working in the round, knit 2 rounds. If you need further instruction regarding knitting in the round on two circulars, see here.


Right sleeve trim
If working contrast collar top, change to CC at the beginning of round 1.
Rounds 1, 3: Knit around to 1 st before marker, p1.
Rounds 2, 4: Purl.
Cast off all sts loosely.

Left sleeve
With RS facing, starting at back base of the sleeve, replace half of the 33 (38, 41, 46, 51) held sts onto first circular needle, and the second half of the held sts onto the second circular needle. Pick up and knit 4 (4, 6, 6, 6) sts at underarm with needle 2, pm.
Complete as for right sleeve.

Finishing
With RS facing, attach yarn to top right side of the neck slit with a single chain stitch. Sc in first slipped stitch, ch 1, skip next slipped stitch (forming buttonhole), then sc in each of the slipped sts to the bottom of the slit. Work 3 sc in the base of the neck slit, then sc in each of the slipped sts back up the top left of the neck. Fasten off. Sew button to left side of neck slit, corresponding to buttonhole on opposite side. Weave in all ends.

Optional ribbon band: Use a safety pin to thread ribbon through the neck band eyelets.


http://www.knitty.com/ISSUEsummer03/PATTdaisy.html

تحياتي : ام ناصر